Main Features
In this section we will describe the main features of Augmentor with example code and output.
Augmentor is software package for image augmentation with an emphasis on providing operations that are typically used in the generation of image data for machine learning problems.
In principle, Augmentor consists of a number of classes for standard image manipulation functions, such as the Rotate class or the Crop class. You interact and use these classes using a large number of convenience functions, which cover most of the functions you might require when augmenting image datasets for machine learning problems.
Because image augmentation is often a multi-stage procedure, Augmentor uses a pipeline-based approach, where operations are added sequentially in order to generate a pipeline. Images are then passed through this pipeline, where each operation is applied to the image as it passes through.
Also, Augmentor applies operations to images stochastically as they pass through the pipeline, according to a user-defined probability value for each operation.
Therefore every operation has at minimum a probability parameter, which controls how likely the operation will be applied to each image that is seen as the image passes through the pipeline. Take for example a rotate operation, which is defined as follows:
rotate(probability=0.5, max_left_rotation=5, max_right_rotation=10)
The probability parameter controls how often the operation is applied. The max_left_rotation and max_right_rotation controls the degree by which the image is rotated, if the operation is applied. The value, in this case between -5 and 10 degrees, is chosen at random.
Therefore, Augmentor allows you to create an augmentation pipeline, which chains together operations that are applied stochastically, where the parameters of each of these operations are also chosen at random, within a range specified by the user. This means that each time an image is passed through the pipeline, a different image is returned. Depending on the number of operations in the pipeline, and the range of values that each operation has available, a very large amount of new image data can be created in this way.
All functions described in this section are made available by the Pipeline object. To begin using Augmentor, you always create a new Pipeline object by instantiating it with a path to a set of images or image that you wish to augment:
>>> import Augmentor
>>> p = Augmentor.Pipeline("/path/to/images")
Initialised with 100 images found in selected directory.
You can now add operations to this pipeline using the p Pipeline object. For example, to add a rotate operation:
>>> p.rotate(probability=1.0, max_left_rotation=5, max_right_rotation=10)
All pipeline operations have at least a probability parameter.
To see the status of the current pipeline:
>>> p.status()
There are 1 operation(s) in the current pipeline.
Index 0:
    Operation RotateRange (probability: 1):
        Attribute: max_right_rotation (10)
        Attribute: max_left_rotation (-5)
        Attribute: probability (1)

There are 1 image(s) in the source directory.
Dimensions:
    Width: 400 Height: 400
Formats:
    PNG
You can remove operations using the remove_operation(index) function and the appropriate index indicator from above.
Full documentation of all functions and operations can be found in the auto-generated documentation. This guide suffice as a rough guide to the major features of the package, however.
Perspective Skewing
Perspective skewing involves transforming the image so that it appears that you are looking at the image from a different angle.
The following main functions are used for skewing:
skew_tilt()skew_left_right()skew_top_bottom()skew_corner()skew()
To skew or tilt an image either left, right, forwards, or backwards, use the skew_tilt function. The image will be skewed by a random amount in the following directions:
| Skew Tilt Left | Skew Tilt Right | Skew Tilt Forward | Skew Tilt Backward |

|

|

|

|
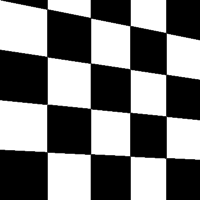
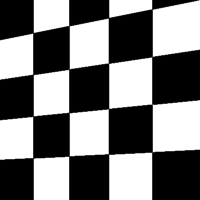
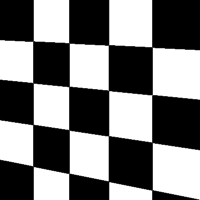
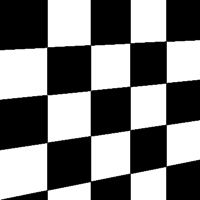
Or, to skew an image by a random corner, use the skew_corner() function. The image will be skewed using one of the following 8 skew types:
| Skew Type 0 | Skew Type 1 | Skew Type 2 | Skew Type 3 |

|
|

|
|
| Skew Type 4 | Skew Type 5 | Skew Type 6 | Skew Type 7 |

|
|

|
|
If you only wish to skew either left or right, use skew_left_right(). To skew only forwards or backwards, use skew_top_bottom().
The function skew() will skew your image in a random direction of the 12 directions shown above.
Elastic Distortions
Elastic distortions allow you to make distortions to an image while maintaining the image’s aspect ratio.
random_distortion()
Here, we have taken a sample image and generated 50 samples, with a grid size of 16 and a distortion magnitude of 8:
| Original Image | Random distortions applied |

|
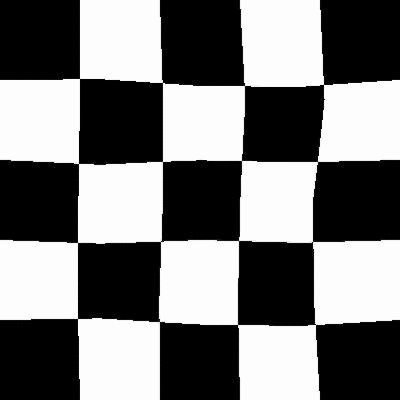
|
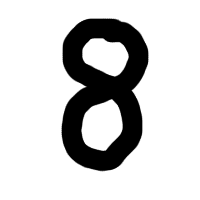
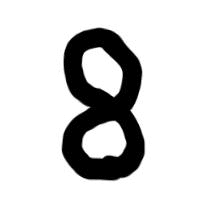
To highlight how this might be useful in a real-world scenario, here is the distort function being applied to a single image of a figure 8.
| Original Image | Random distortions applied |

|

|
Realistic new samples can be created using this method.
See the auto-generated documentation for more details regarding this function’s parameters.
Rotating
Rotating can be performed in a number of ways. When rotating by modulo 90, the image is simply rotated and saved. To rotate by arbitrary degrees, then a crop is taken from the centre of the newly rotated image.
Rotate functions that are available are:
rotate()rotate90()rotate180()rotate270()rotate_random_90()
Most of these methods are self-explanatory. The rotate_random_90() function will rotate the image by either 90, 180, or 270 degrees.
However, the rotate() warrants more discussion and will be described here. When an image is rotated, and it is not a multiple of 90 degrees, the image must either be stretched to accommodate a now larger image, or some of the image must be cut, as demonstrated below:
| Original Image | Rotated 10 degrees |
|
|

|
As can be seen above, an arbitrary, non-modulo 90, rotation will unfortunately result in the image being padded in each corner. To alleviate this, Augmentor’s default behaviour is to crop the image and retain the largest crop possible while maintaining the image’s aspect ratio:
| Original Image | Rotated 10 degrees, automatically cropped |
|
|

|
This will, of course, result in the image being zoomed in. For smaller rotations of between -5 and 5 degrees, this zoom effect is not particularly drastic.
Shearing
Shearing tilts an image along one of its sides. The can be in the x-axis or y-axis direction.
Functions available for shearing are:
shear()
If you shear in the x or y axis, you will normally get images that look as follows:
| Original image | Shear (x-axis) 20 degrees | Shear (y-axis) 20 degrees |
|
|

|

|
However, as with rotations, you are left with image that are either larger in size, or are cropped to the original size but contain padding in at the sides of the images.
Augmentor automatically crops the largest area possible before returning the image, as follows:
| Original image | Shear (x-axis) 20 degrees | Shear (y-axis) 20 degrees |
|
|

|

|
You can shear by random amounts, a fixed amount, in random directions, or in a fixed direction. See the auto-generated documentation for more details.
Cropping
Cropping functions which are available are:
crop_centre()crop_by_size()crop_random()
The crop_random() function warrants further explanation. Here a region of a size specified by the user is cropped at random from the original image:
| Original image | Random crops |
|
|

|
You could combine this with a resize operation, so that the images returned are the same size as the images of the original, pre-augmented dataset:
| Original image | Random crops + resize operation |
|
|

|
Mirroring
The following functions are available for mirroring images (translating them through the x any y axes):
flip_left_right()flip_top_bottom()flip_random()
Of these, flip_random() can be used in situations where mirroring through both axes may make sense. We may, for example, combine random mirroring, with random distortions, to create new data:
| Original image | Random mirroring + random distortions |
|
|
Notes
Checkerboard image obtained from WikiMedia Commons and is in the public domain. See https://commons.wikimedia.org/wiki/File:Checkerboard_pattern.svg
Skin lesion image obtained from the ISIC Archive:
- Image id: 5436e3adbae478396759f0f1
- Image name: ISIC_0000017.jpg
- Download: https://isic-archive.com:443/api/v1/image/5436e3adbae478396759f0f1/download
See https://isic-archive.com/#images for further details.